Collections
Collections in E-commerce are groups of items sharing common attributes.
Some of the advantages of using Collections by E-commerce stores include but are not limited to the following:
- targeted marketing campaigns and promotion of related or complementary items;
- improvement of customers' product discovery and shopping experience;
- increased sales and customer satisfaction;
- upselling during the checkout process.
The Ucraft Next merchants can also create and manage collections for blog posts, support and help articles, contacts, events, or anything else they want to have in an identical series.
In Ucraft Next, the Collection Management structure is similar to that of Product Management; thus, to improve and optimize the management and maintenance of these pieces, the same logic is used for both.
- Attributes: Attributes are shareable for Products and Collections.
- Categories: A Category page is generated for each first-level Collection Category to design it separately.
- Templating: To ease the designing process, when creating a Collection and Collection Category, appropriate blank item templates are generated.
- URL structure: URLs are SEO-friendly and human-readable.
E-commerce Dashboard
The following four subsections are available under the Item Management section:
- Collections
- Categories
- Items
- Fields
The following screenshot illustrates the Item Management section and its subsections on the Dashboard.
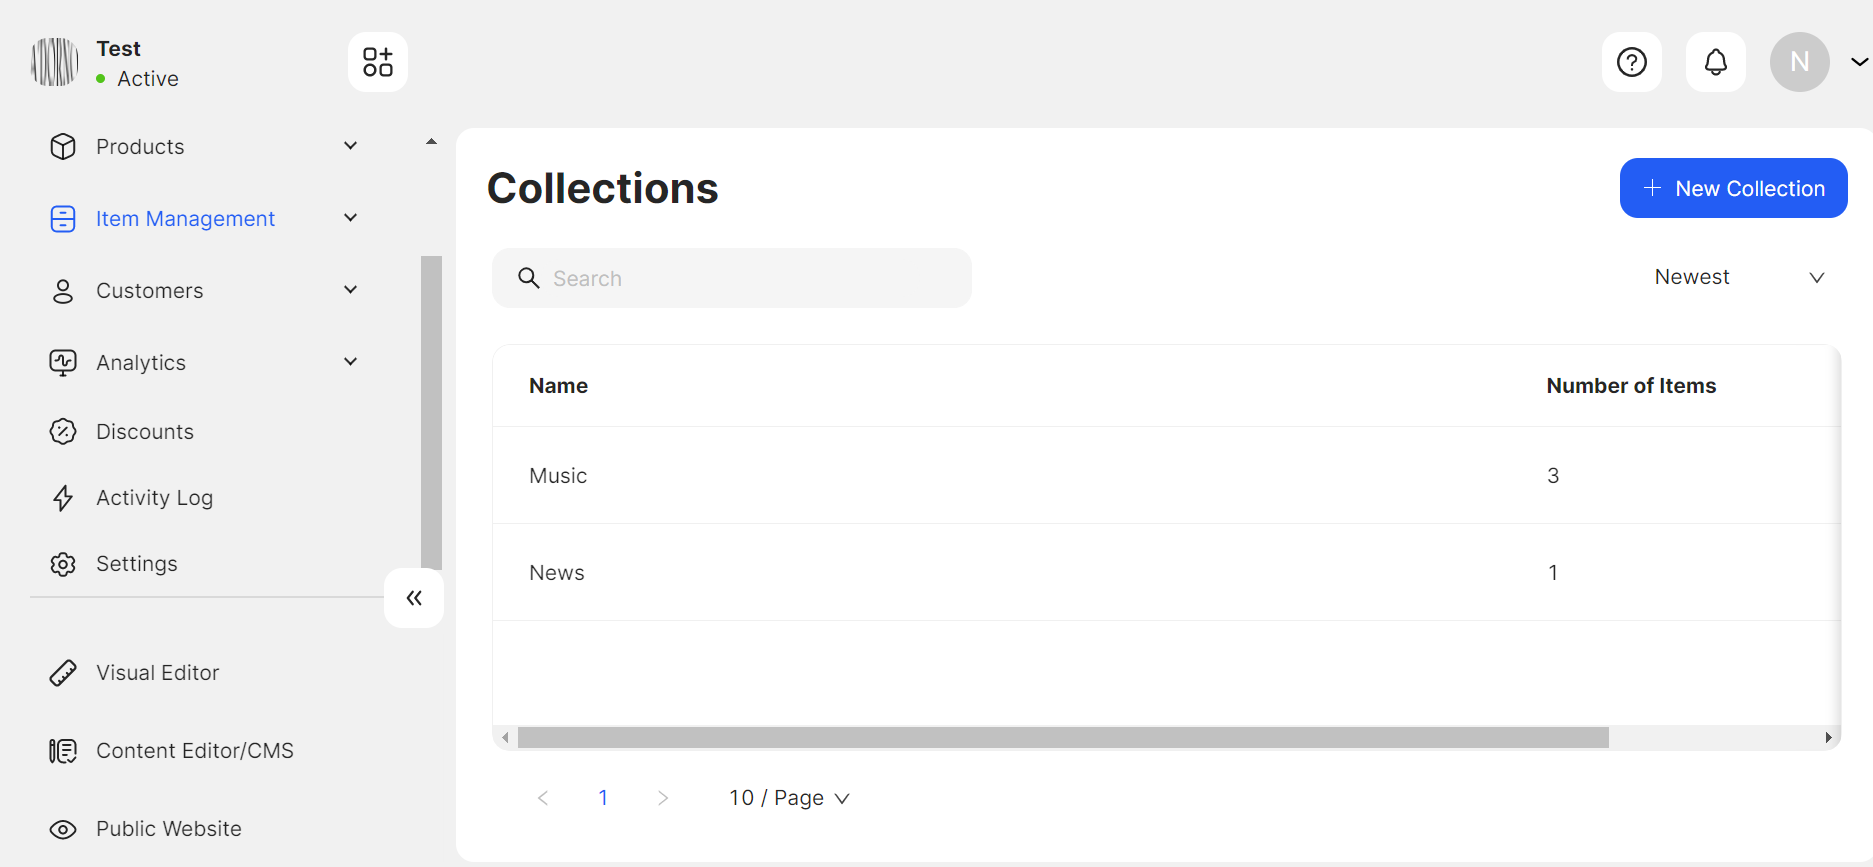
The Collections subsection repeats the logic of the Product Families subsection. It displays the table of existing collections, enables filtering, sorting, and updating them, and creating a new collection by attaching different Fields. Collections are created based only on one Product Type: Collections.
The Categories subsection logic is the same for managing both the Collections and Products sections. It is possible to create different collection categories and design templates for them.
The Items subsection repeats the logic of the Products subsection. It displays the table of existing collection items, enables filtering, sorting, and updating them, and creating a new one. When creating a new Collection Item, it is possible to choose any existing Collection and fill in the Fields specified for that collection.
The Fields subsection works with the logic of the Attributes subsection. After creation, it is possible to apply the Field to a Collection to design the template and content for a Collection Item. Except for the default Fields (Name, Categories, Visibility, and SEO-related ones), the following Fields are available to create:
Text, Rich Text, Selection, Multiselection, Boolean, Date and Time, Date, Checkbox, File, Image, and Gallery
Collections Back-end Structure and APIs
Collection Management is an E-commerce-related action supported by the E-commerce API server.
Collections
When creating Collections, actually product families of the collection type are created, which are stored in the DB as Attribute Families with Attribute Groups. The system page type is Attribute Family. When creating a Collection, an appropriate page is generated on the builder side.
Fields
The collection Fields are Attributes shareable for Products and Collections. After creation, they are attached to a Collection (an Attribute Family) and become Collection Item Fields.
When updating any attribute, the system immediately sends a response about the update, and simultaneously a Kafka message is produced to the Command-Bus service to execute the update of related entities in the background.
Collection Items
For creating a new Collection Item, a Collection is selected, which provides the relevant view. The view is designed by the default Attributes and Attributes included in the Attribute Family.
Collection Items are translatable. The data filled in the attribute fields is stored in the following tables:
collection_item, which indicates the relation of a Collection Item to its Collection.collection_item_value, which specifies the relation between the Collection Item value and Attribute.collection_item_value_translation, which stores the values filled in those attribute fields.
Categories
The Collection Categories are separate from the Product Categories and have their own root category. The differentiation is made through the type, i.e., in the categories table, a column is added to indicate the type: Product or Collection.
The system page type for the collection root category is collection_root_category.
When the collection root category template is modified in the Visual Editor, the system generates a new system page type collection_category.
The collection_item_categories table indicates the relationship between a Collection Item and Category.
GraphQL APIs
collection.graphql
The queries are for:
- getting the list of Collections, one Collection by its ID, the list of Collection Items, one Collection Item by its ID, and a unique slug for the Collection Item;
- searching Collections and Collection Items;
- sorting Collections;
- filtering Collection Items by the Category ID, status, attribute, and Collection ID;
- adjusting the visibility of Collection Items.
Via the mutations, it is possible:
- to create, update and delete Collections and Collection Items;
- to upload a file when creating a Collection Item, in the case of the file-type attribute.
Implementation of Search Functionality
When creating a Collection or Collection Item, the E-commerce API produces a Kafka message to the Collector service, which consumes the message and stores this searchable data in Elasticsearch.
Collection Templates
Each Collection has its Collection Item template. When creating a Collection (a group of Item pages), a relevant template (an Item page) is created containing the following parameters:
attributeFamilyId and attributeFamilyGroupType
Root Category template is the default one, and all the categories inherit it unless a template for the given category is created and saved.
📘 See URL Structure and Templating for more details.
Flow for Collections (Attribute Families)
The Collection Item page layout is rendered in the Visual Editor by sending a request to the endpoint /api/pages/attribute-family/{id}, which retrieves the Collection Item page data.
The Visual Editor URL for a Collection Item page is /admin/collection-item/{attributeFamilyId}/~/visual-editor.
The below screenshot illustrates the Collection Item template page in the VE.

It is possible to switch to another Collection Item page using the dropdown available on the Top Panel.
In the Public mode, the page is rendered through a request to the endpoint /api/pages.
For example:
/api/pages?path=/recipes/soups/i/mushroom-soup
/i/ hints to the back end that this is a Collection Item page request.
/mushroom-soup via Redis hints to the back end the Attribute Family (Collection) of the given Collection Item, and the relevant page is retrieved through the Attribute Family ID.
Flow for Categories
The Collection Root Category page alias is /collection-category.
The list of categories is rendered in the Visual Editor by the following category query with the collection type filter:
type Query {
    categories(
        first: Int
        page: Int
        input: CategoryInput
    ): CategoryPaginator

    category(
        id: ID @eq
    ): Category

    categoryByAlias(
        input: CategoryByAliasInput @spread
    ): Category

    generateCategoryUniqueSlug(
        name: String!
    ): String!
}

type CategoryPaginator {
    data: [Category!]!
    paginatorInfo: PaginatorInfo!
}

type Category {
    id: ID!
    name: String!
    description: String
    slug: String!
    type: CategoryType!
    urlPath: String
    image: String
    imageUrl: String
    metaTitle: String
    metaDescription: String
    position: Int!
    status: Boolean!
    displayMode: CategoryDisplayMode!
    parentId: ID
    parent: Category
    additional: String
    createdAt: DateTime!
    updatedAt: DateTime!
    companyId: ID
    company: Company!
    productsCount: Int
    itemsCount: Int
    success: String
    translations: [Translation!]!
    children: [Category!]
    childrenCount: Int!
    mediaIcon: MediaItem
    mediaImage: MediaItem
    products: [Product!] @belongsToMany
    items: [CollectionItem!] @belongsToMany
    pivot: ProductCategoryPivot
}
The Visual Editor URLs for the root are /admin/collection-category/~/visual-editor and /admin/{collection-category-path}/~/visual-editor.
The second (first)-level categories do not have their pages unless the user saves the category page. The page data is retrieved by requesting the endpoint /api/pages.
For example:
For the Root Category, the endpoint api/pages?path=/collection-category is called.
For the second (first)-level Category, the endpoint /api/pages?path=/{collection-category-path} is called.
The back end understands and returns the Collection Category page for the given Category. The back end returns the Collection Root Category page if there is no Collection Category page for the given Category.
The below screenshot illustrates the Default Category template page in the VE.
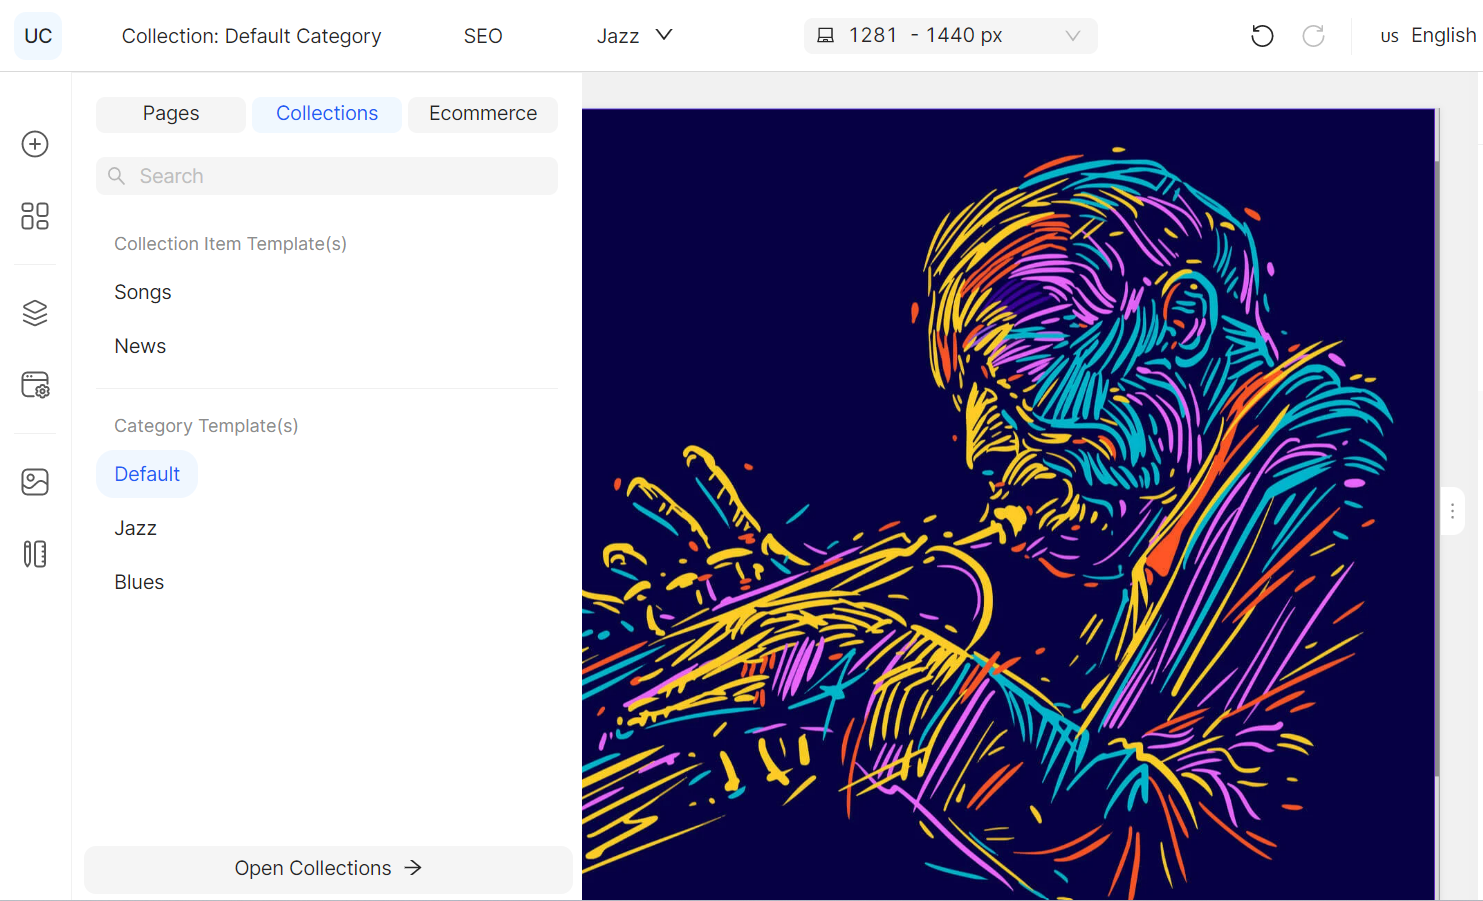
On publishing the Collection Category page, the Visual Editor front end sends the Collection Category ID to enable the back end to understand for which Collection Category the current layouts are saved.
- In case there is no Collection Category ID, the Collection Root Category layouts are updated.
- If there is a Collection Category ID and there is no Collection Category page for the given ID, a page is created, and the main layout is cloned and assigned to the newly created page.
- In case there is a collection category ID, and the collection category page exists, the page layout is updated.
In the Public mode, the page is rendered using the endpoint /api/pages.
For example:
/api/pages?path=/recipes/soups
/recipes/soups hints to the back end that this is a Collection Category page request; thus, it retrieves the Category ID from Redis and returns the page for the given Collection Category or Collection Root Category page.
Widgets in the Visual Editor
The Fields, designed for the given Collection, become widgets and are, by default, available for the Collection Item pages in the Visual Editor. For all the other pages the widgets are applicable to drop into the Collection List widget. The Collection List, Category Name, and Collection Filter widgets are collection-specific widgets.
All the widgets are in the Collections group on the Left Panel and become available depending on the page.
The below screenshot illustrates the Collection group of widgets.
[block:image] { "images": [ { "image": [ "https://files.readme.io/053e80f-image.png", null, "" ], "align": "center", "sizing": "300px" } ] } [/block]
Collection List
The Collection List widget is an Item Repeater that can be dropped onto any page except the Collection Item page. After dropping the widget, the attributes predesigned for the given collection become available as widgets grouped under the Collection dropdown.
When dropping the widget on any Category page, it, by default, displays the Collection Items designed for the given Category.
When dropping the widget on any other page, the Category is selected from the widget settings to bind the Collection Items relevant to the chosen Category.
As both the Collection List and Product List work based on the Item Repeater, the system, by default, restricts dropping Product widgets into the Collection List, and vice versa. When dropping any widget into the Item Repeater, a relevant query differentiating the widget type, i.e., a product or collection widget, is sent.
Category Name
The Category Name widget is, by default, available to drop on the Category and Collection Item pages. In order to have it on any other page, it must be added to the Collection List widget.
Collection Filter
The Collection Filter widget is a dynamic widget that is available only for the Category pages. The category ID is the current category ID. The filterable attributes rendered in the widget depend on the page where the widget is dropped.
Collection Item Management
The Collection Item data, including the translations, the Save button state, etc., is stored in the State Management Store. The communication between different components is controlled through the Global State Management system.
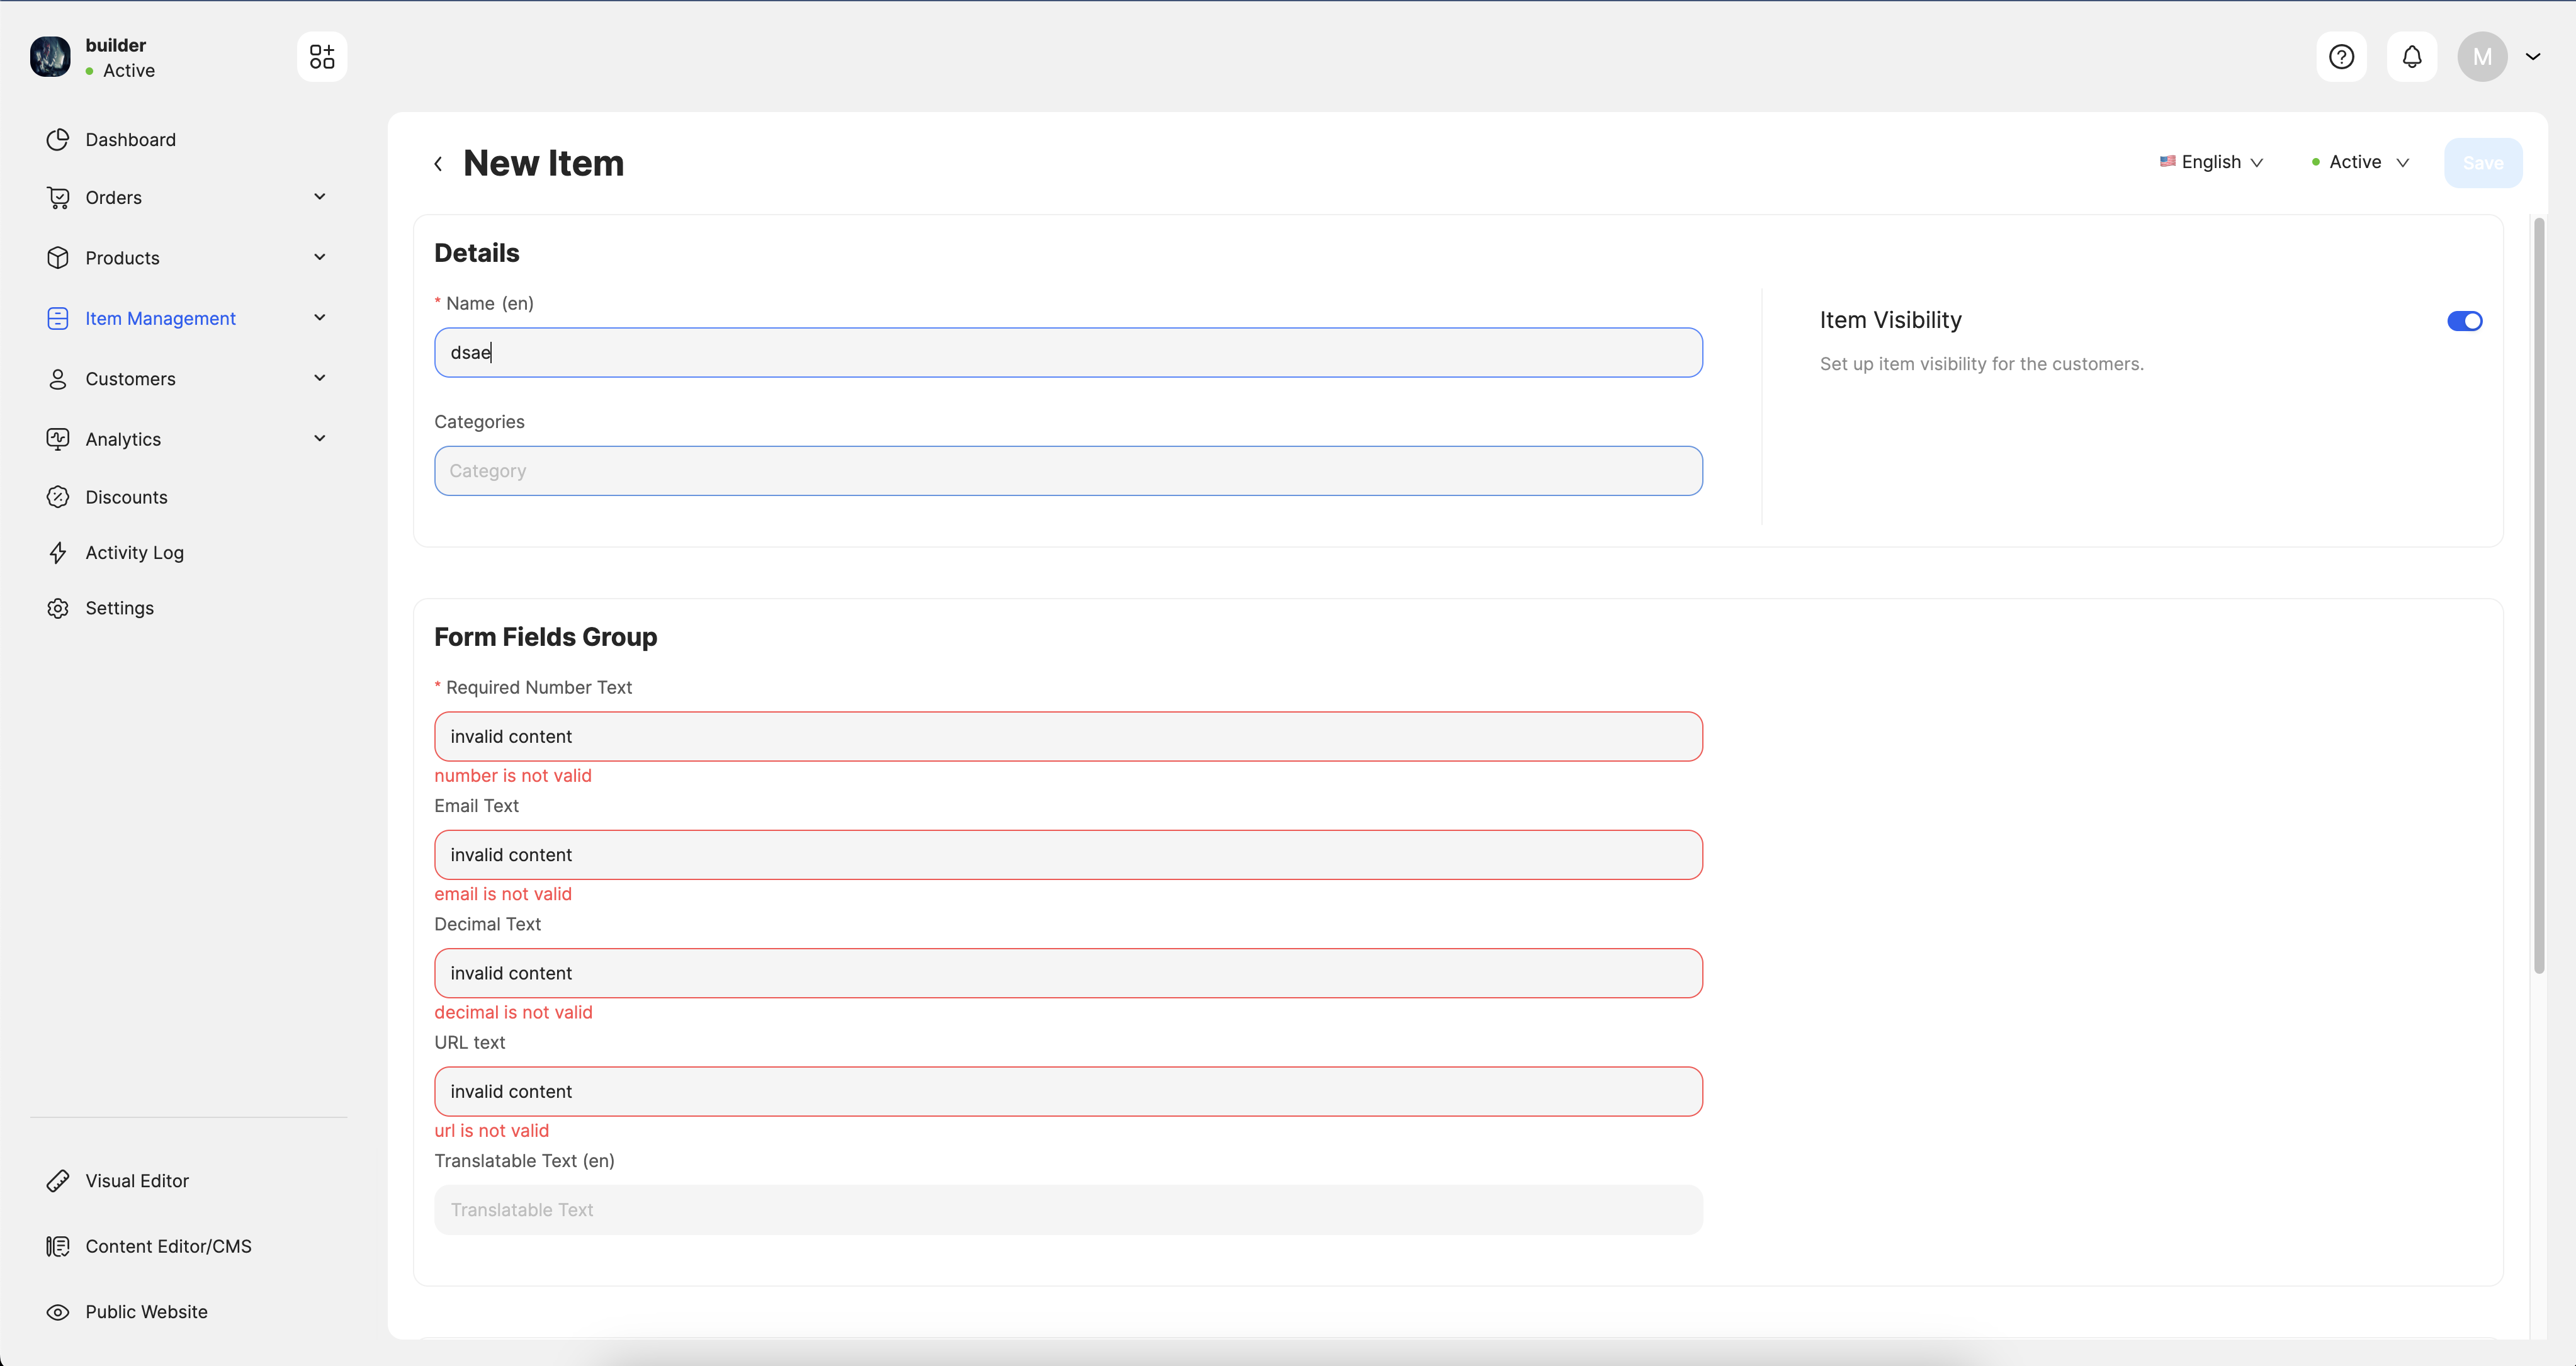
Form Builder
The Form Builder is shareable for rendering both the Collection and Product Attributes.
After creating and applying a new Field to a Collection, the Form Builder renders this element and displays it on the Collection Item creation page (in addition to the default Fields).
The Form Builder renders elements using the Field data: type, type-specific validations, and configurations.
The following screenshot illustrates the Fields and their validations.
State Management Store
The Collection Items current state is managed through the State Management Store where a StoreInstance is created for the Collection Item data and variables.
The method used to create a StoreInstance is the function createUcStore which takes the arguments initialState and handlers.
The initialState is the store main structure, and handlers are methods to manipulate the store state. Each handler takes two arguments:
currentState, which always exists, and payload, which is optional to pass.
StoreInstance contains <Provider> based on the React context. The <Provider> makes the store available for its child components. The components are subscribed to a store property change through the useStateSelector hook to dispatch actions. actions is an object containing the functions with the relevant names defined in handlers. Thus, the relevant functions are called.
The useUpdate hook returns the update function. The latter updates the state through:
- the method contained in
actionsupdate(actions.increment()) - the
callbackfunction
update((state)=>{
  state.count++
return state
})
It always gets the current state from the callback function and returns the updated state.
The function unsafe_store_state is for getting the current state, and unsafe_store_update is for updating the state. Both functions can be called outside of the provider.
![]() A createUcStore example
A createUcStore example
const {
  Provider,
  useStateSelector,
  useUpdate,
  actions,
  unsafe_store_state,
  unsafe_store_update,
} = createUcStore({
  initialState: {
    count: 0,
  },
  handlers: {
    increment: (state, payload) => {
      state.count++;
    },
    decrement: (state) => {
      state.count--;
    },
  },
});